Archive for year: 2016
Erosion Control vs. Sediment Control
The overarching principle of Erosion Control vs. Sediment Control is that it is much easier and cheaper to prevent erosion from occurring in the first place than to try and remove the sediment once it has eroded.
Erosion and Sediment Control is a rapidly changing field. Traditional approaches have been applied with varying levels of success over the years. In addition, there are a host of new approaches, practices, and proprietary products that should be shared, understood, and considered on construction and municipal sites. Sites can be sustainably managed by minimizing the impact of earthwork using proven erosion and sediment control measures..
Erosion Controls are source controls designed to prevent erosion from occurring. Solutions include seeding solutions like hydroseeding and terraseeding, wood chip mulch and rolled erosion control products.
Sediment Controls are downstream controls designed to remove sediment from runoff. Solutions include sediment fences and barriers, filter socks and other forms of mechanical filtration.
At the detailed design stage impacts can be minimized through efficient earthworks and erosion and sediment control measures. It is vital that development be successfully completed in balance with the natural environment.
The Erosion and Sediment Control Association of British Columbia is a non-profit organization is dedicated to increase the level of expertise in the Erosion & Sediment Control field throughout British Columbia. Their list of Best Management Practices are divided into Erosion Control and Sediment Control solutions that we think you will find useful.
7 Habits of Successful Waterers
“I am not trying to be a bad waterer, I just don’t think I fully get how to be a good waterer.”
If you identify with that statement, this article may be for you.
The single most important resource in landscape care is water. In varying degree all plants need water to survive and thrive. So much time, money, and frustration can be saved with just a little attention toward proper watering practices. The excuses for not watering are as numerous as the day is long and we’ve heard them all.
Though strategic placement of landscape mulch in garden areas and around trees, shrubs and flower beds will prolong moisture retention of the soil, a consistent watering regime is still needed. The basic fact is that without water – or with too much – all life fails. It’s a simple biological fact.
You can be sure that if you practice the following seven habits religiously, you’ll see a definite improvement in the health and vigor of your plants. These habits will enable you to:
- use less water
- keeps you in touch with your plants
- turn watering into a calming activity rather than a stressful task
Read on for the full article:
The single most important resource in landscape care is water. In varying degree all plants need water to survive and thrive. So it stands to reason that my single biggest frustration as a landscape professional is convincing landscape owners to pay attention to watering. So much time, money, and frustration can be saved with just a little attention toward proper watering practices.
The excuses for not watering are as numerous as the day is long and I’ve heard them all. I can tell you from experience that none of them is valid, especially if you’re a shrub, tree, or other plant struggling to get a drink of water to survive. While all this may sound a little harsh, the basic fact is that without water – or with too much – all life fails. It’s a simple biological fact.
Just recently I was discussing watering with a long-time client whom I’m after every year to water more. I finally said, “You know I love you, but you are a terrible waterer.” Her response was priceless. She paused, gave me a long, low “hmmmm” and said, “Yes, I know, but maybe that is something you can help me with. I mean, I am not trying to be a bad waterer, I just don’t think I fully get how to be a good waterer.”
 John Lysak dutifully watering new annuals planted for a splash of summer color.
That made me think, “she certainly isn’t the only bad waterer; how can I help people wrestling with how much – or how little – to water?” So, at my client’s urging, I came up with these “Seven Habits for Successful Watering.” I promise you that if you practice these seven habits religiously, you’ll see a definite improvement in the health and vigor of your plants:
- Visit your plants regularly
Seriously, get to know your plants and your landscape intimately. Some areas are high and hot, other low and wet, still others feature trees and shade, while some might be wide open and exposed to the drying sun. All have different watering needs. You can’t truly know this if you don’t visit them. I take a walk every day after work as a way to decompress from the day, check in to see what is in bloom, and tend to the occasional weed patch. Yes, I am a professional…and I still find weeds in my garden!!
- Touch the soil often
Nothing provides accurate information like engaging your senses. All soils are different – do you know what types of soil you have? Is it sandy and dry? Soft and moist? Do you know if it holds water well or does it just run right through? These things matter. Get your hands in the soil and know for sure. Something as simple as seeing some wilt and then scratching at the soil at the base of the plant may tell you if that wilt is from being over dry or over wet.
- Watch the water
You can water all day long, but that’s never a good idea – it’s wasteful and counter-productive. In fact, the single biggest waste of water and cause of pollution is run-off from unmonitored watering.
If you watch water carefully, you’ll notice that at first it runs off dry soil until you achieve some saturation. Then, once fully saturated, water simply runs right through. What’s the lesson here? More is not better. You want to water just enough to enable it to soak in, and sometimes that requires a little help.
Try watering very lightly for a longer period of time. Or perhaps create a little well to hold the water and encourage it to sink in rather than run off. Try wetting the top soil, then brush it away with your hands to see how far it sunk in. Just imagine that old dry sponge at the kitchen sink – it takes a moment for the water to break that dry seal before the sponge will accept the water – same with over dry soils.
- Watch the weather
This may come as a surprise, but plants sweat just like people. Well, not exactly the same. While people have sweat glands, plants have stomata – tiny pores that dot the plant’s surfaces. Stomata enable the plant to rid itself of excess water through transpiration – a process that removes through evaporation as much as 97-99 percent of the water taken up by its roots.
Weather, then, affects transpiration just like sweating. The hotter the nights, the more plants transpire. Heat and humidity make plants “sweat” through their leaves, drying them out and putting them at risk if water isn’t replaced in a timely and efficient manner. For example, some plants love misting while others hate it.
Knowing your plants and what they like is important, just like understanding the local weather and environmental conditions. Generally speaking, we don’t need to do much watering in New England in April or May, but by the time we hit June, soils are drying up, the rains are slowing down, and plants could likely use a good drink.
- Frequency and duration
Not all plants need the same duration or frequency of watering. If you practice habits 1-4, you’ll be able to accurately gauge how much water your plants will need to stay happy and healthy. Almost all plant resource books and websites that give you plant data will suggest what a plant likes – moist soil, dry soil, loamy soil, sandy soil – these “likes” correlate with water needs. Moist and loamy soils will indicate an affinity for regular “dampness” in the soil. Dry and sandy soil lovers will be okay with periods of dry out.
- Adjust your irrigation system
Many landscapes benefit from irrigation systems, but it’s important to test and adjust them. One of the biggest issues with irrigation systems is the “set it and forget it” mindset. Many landscape owners simply set the automatic watering timer and then assume that will take care of things. But no single setting will deliver the proper amount of water throughout the three distinctly different New England growing seasons. Without making seasonal adjustments, you’re guaranteed of over-and under-watering throughout the year.
Here is something to keep in mind; in the springtime, the plant “juices” are flowing upwards from the soil to the tip tops of the trees. The plants are pulling energy, liquids, and nourishment up from their roots and pushing out new spring growth. If you envision having a cool glass of water and using a straw to pull up a refreshing drink…that is not much different than what the plants are doing. So all the trees (effectively the biggest straws) are pulling water out of the soil with great force. Rain replenishes some, but as you all know, one 80-degree day and you can feel super parched, super fast. Same goes for plants and the big ones can take up the resource faster than the little ones.
- Make watering easy
Nobody likes doing things that are difficult or frustrating. Consider turning what could be a chore into a relaxing and enjoyable experience by making the task easy!
I am a firm believer in point-of-contact watering. That’s the fancy term for using a hose or a watering can to water the ONE plant that needs it. If you have one operational spigot in your landscape you can be sure that watering won’t happen. The WORST two tasks of gardening in my opinion are dragging and coiling heavy, dirty hoses. I confess I have watched a plant suffer and die before I got around to dragging a hose out to rescue it.
Now I have a “free-line” on my irrigation system and spigots that are placed roughly every 75 to 80 feet throughout my 2.5-acre landscape. I keep a 100-foot hose coiled in several of the location and I can easily access water whenever and wherever I want.
My approach is to run the irrigation system to provide a steady moisture level — not overwatering or creating run-off. I walk my landscape every day and when a plant needs water, I grab the hose or fill a watering can and spot-water right where it’s needed. This uses less water and keeps me in touch with my plants. And, as hokey as this may sound, it provides a wonderful way to meditate and unwind from my day. Watering has turned into a calming activity rather than a stressful task.
Now don’t you feel like getting out there and watering?
The original article was posted on theGardenContinuum.com – 7 Habits of Successful Waterers.
Is Coloured Mulch Safe for Your Garden
Is Coloured Mulch Safe for Your Garden?
The use of coloured mulch has increased over the last number of years, as the bold and rich colour offers an attractive look for landscaping while continuing to offer the benefits of mulching. Unlike natural, non-dyed mulch, which tends to fade to gray, coloured mulch can hold its colour for a year or longer.
However, with these benefits, public concern has also been raised regarding the use of coloured mulch. The primary question is: Is Coloured Mulch Safe for Your Garden?

What about the dye?
The typical dyes used for colouring mulch are iron oxide-based and carbon-based. Iron oxide, used to produce red mulch, is commonly known as rust, and is used extensively in paints, cosmetics, and even used to dye flowers. Carbon, used to produce black mulch, is an element often used for ink or paint. Both bases for these dyes are considered natural, non-toxic and safe for handling. Most other colours are made with vegetable-based colourants, also from naturally occurring elements.
A study (“Are Mulch Colorants Safe”) conducted by the Mulch and Soil Council, determined that colourants typically used for coloured mulch are deemed non-toxic and when used properly, would not have any negative effects on the environment.
Of course, a savvy customer should ask about the product they are purchasing, and the company should know about their product. For example, at Denbow, we know that our mulch is coloured with non-hazardous, safe for the environment, ingredients.

What is in the wood?
As the colourant used in coloured mulch has been generally deemed safe for use, eyes have turned to the content of the wood. The use of recycled wood is a beneficial practice for the environment, yet depending on the content of the wood, harmful toxins (such as lead) could be lingering from past uses.
When purchasing coloured mulch, then, it is important to consider the wood content. In an effort to improve the quality of our products, Denbow produces a number of our own materials, including processing our own mulches. We work with select sources of material to minimize foreign material in our finished products. Our red and black coloured mulches are made of locally recycled wood, free from these contaminants.

Will it affect the soil?
There is a concern that when using wood mulch, the carbon of the wood will interact with the nitrogen in the soil, using the nitrogen to help the decomposition process, but in turn, pulling the nutrients from the soil. Coloured mulch actually decomposes at a slower rate than regular wood mulch, which means the nitrogen is removed from the soil at a slower rate.
Use of a nitrogen-rich fertilizer is encouraged, as for whether or not mulch is used, the soil can benefit from the implementation of a regular fertilization program. It is recommended when adding new mulch, to take the time to remove old mulch or be sure to cultivate your existing mulch on a monthly basis in order to help healthy decomposition.
At the end of the day, if you are looking for a pop of colour to refresh a garden bed, or seeking to landscape a new area and considering an alternative to the natural mulch, coloured mulch is a safe and beautiful option. Is coloured mulch safe for your garden? Yes, Denbow’s coloured mulch definitely is.
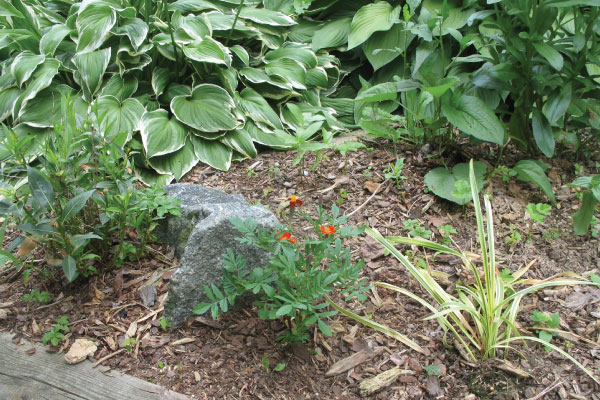
Benefits of Using Mulch in Your Garden
THE BENEFITS OF USING MULCH IN YOUR GARDEN
Those of us with a green thumb have two challenges when it comes to gardening: maintaining a healthy and moist garden bed and keeping the weeds from invading. Daily watering is not always possible for a variety of reasons, including conservation of water and summer watering restrictions. Regular weeding, especially with a large garden plot, requires not only a good amount of time but also puts a repetitive strain on knees and back which can hinder a gardener’s ability to keep up with the job. Reducing the amount of energy and water required to maintain a garden can be found in utilizing more sustainable gardening practices. One excellent option is to introduce mulch to your garden.
THE KEY BENEFITS OF USING MULCH IN YOUR GARDEN

There are a number of benefits of using mulch in your garden; here are a few that may encourage you to get started.
- Keeps the weeds away. A layer of mulch on top of the garden soil may be the best solution to creating a weed-free bed. A good coating of mulch will inhibit the germination and growth of weeds in your soil.
- Holds in moisture and nutrients. Not only are weeds an embarrassing sight for sore eyes, they can steal both nutrients and water from the plants in your garden. Laying mulch will help the soil hold in its moisture and nutrients so the plants can absorb what they need, and organic mulch will also release additional nutrients into the soil. Laying mulch will also help ensure your soil will not dry out too quickly, especially while at work during a hot summer day, or on vacation and asking your neighbour to water for you.
- Regulates soil temperature. Mulch also helps regulate the temperature of the soil so plants or trees don’t get stressed from high to low fluctuations. This means that adding mulch to your garden can actually be beneficial not only in spring and summer but also act as a protectant for your soil and year-round plants in the cold and wet weather of winter months.
- Makes a home for the bugs you want, and repels the ones you don’t. Mulch can increase biodiversity in your yard by giving a variety of insects and other tiny creatures homes and shelter, such as earthworms who continue the process of improving soil structure. Certain types of mulch can also help repel ticks, gnats and fleas.
- Protects the soil from both nature and people. Mulch breaks down very slowly, protecting from the elements such as the drying heat of the sun, but also from heavy rainfall, preventing it from becoming too compact, or even eroding. A stray weed whacker or lawn mower that comes too close to your garden can also do damage, but mulch can protect your plants by providing a buffer.
To receive the best benefits from using mulch in your garden, add a layer of at least 5 – 7.5 cm (2 – 3 inches) and maintain it as long as you have plants in your garden. A vegetable garden will appreciate the added support for its season, while trees and shrubs in your yard can benefit all year round.
WHAT TYPES OF MULCH ARE THERE?
There are many types of mulch to choose from, but most of them can fall into one of two groups.
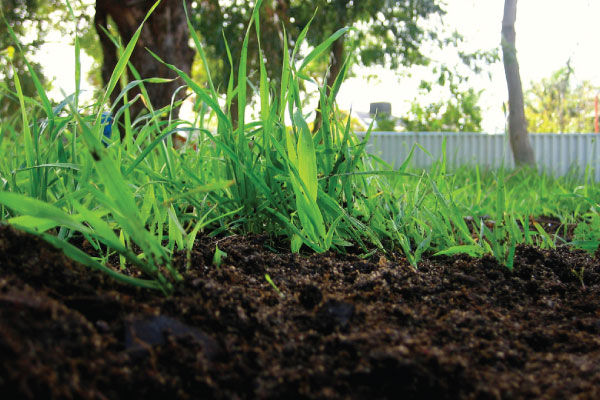
ORGANIC: This includes wood chips, leaves, compost, peat moss, grass, pine-needles and straw. This may be the superior of the two because as the organic mulch decomposes, it will add beneficial organic nutrients to your plants. Be careful to ensure the grass clippings or leaves used do not contain pesticides or fertilizers, as these can contaminate the natural processes of decomposing.
INORGANIC: This includes stones or rubber chips or any similar material. These mulches will still inhibit weeds and moisture loss, but will not improve your soil condition or add any nutrients.
Mid-spring is the best time to lay down mulch, in order to keep plants at their healthiest from the start. If this is your first time adding mulch, remember to weed your bed thoroughly before you begin. If you already have a layer of mulch from the previous season, be sure to break it up, or remove some of it, before adding a new layer. If the layer gets too thick when adding to existing mulch, your mulch might not decompose and will hinder the possible root growth. Be sure to stay within the 5 – 7.5 cm range at all times.
While mulch can benefit your trees, be sure not to pile it up around the trunks of trees. Excessive mulch can rot the tree’s trunk and will create a haven for insects that will damage the tree. It also encourages the tree to grow a secondary root system away from the rot. When this happens, the original, deep roots can start to wither and make your tree vulnerable in dry spells. Be sure to keep mulch 6 – 12 inches away from the base of your trees or shrubs The same holds true with your plants: be sure to give your plants some breathing room by keeping mulch about 2.5 – 5 cm away from the plant crown.
You have prepared your garden, planted, and added the necessary layer of mulch: the hard work is done! Watering should now be very easy. At the beginning of the season, and for the first 3 – 4 weeks after planting, a deep watering that thoroughly soaks the garden will be needed at least once a week. If you have great soil, a nice layer of mulch and water efficient plants, your garden should thrive off natural rainfalls only (depending on the season). If you add plants later or experience any times of drought, more water will be necessary. If you are growing crops to eat, once food begins to grow, you may need to water more often as your crops will need the excess water to create lush and nutritious food.
Interested in experiencing the benefits of using mulch in your garden? Let us know!
Protecting Fraser Valley Dykes from Erosion
Protecting Fraser Valley Dykes from Erosion of the Fraser River Banks
Starting in the Rocky Mountains, and pouring into the Strait of Georgia, the Fraser River is B.C.’s longest river, and largest flowing into the Pacific seaboard of Canada. The Fraser is a busy river: it is home to sturgeon, a provider of water for pulp mills, and in the Fraser Valley, its banks neighbour rich farmland.
After settlers came to the Fraser Valley, they were met with the power of the Fraser River. 1894 brought a disastrous flood to the region when the area had no defense against the rising waters of the river. A dyking system was soon created, but in 1948, with lack of care for the aging dykes, and the banks protecting them, another even more consequential flood, devastated the region, with an equivalent of over $200 million in damages.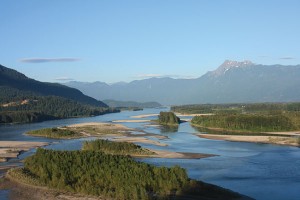
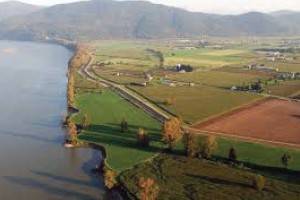
In 2013, new erosion on the banks of the Fraser River raised an alarm. Existing erosion arcs, where strong currents had worn down the soft silt at the bottom of the riverbank, were monitored, and advancing development of a new arc called for immediate action, as it was only 30 meters from the dyke; the spring freshet could mean a repeat of history for the area. The dyke was protecting over 12,000 acres of diverse agricultural land, the historic Clayburn and Matsqui villages, land belonging to the Matsqui First Nations, and major regional infrastructure, such as gas mains, water transmission main, and the wastewater treatment plant. Flooding of this area would have even greater negative impact than it did over 60 years ago, an estimated $2 billion in damages.
The city of Abbotsford called for help, and made an emergency repair in early 2014 on the bank using rock armoring, or riprap, providing a new boundary for the river’s flow. Use of riprap is beneficial, as it deflects the impact of the current, absorbing the energy of the water, and therefore protecting the bank. It also slows the flow of water, and provides further protection from debris that the river might be carrying.
An example of such work can be found in Denbow’s Strachan Point project, where Charles Creek erosion was a threat to a CN Rail bridge, the highway bridge, and two private bridges providing access to local homes. Building up and widening the creek bed, and then reinforcing with the process of rock armoring, eliminated the threat.
 Long-term, the Fraser Valley has more work to do to fight erosion. Since the 2014 fix, two new erosion arcs have developed. The city of Abbotsford engaged the services of Northwest Hydraulics Consultants to undertake a study on the Fraser River erosion. Their findings urged the city to not only continue the upgrades to existing bank protection with rock armoring, but also to utilize rock spurs.
Rock spurs are linear structures, placed at the bottom of the bank, to assist in changing the direction of the river’s flow. This would slow the process of erosion drastically, by moving the force of the water away from the bank toe, which is where erosion arcs begin.
The city approved the proposed project in December 2015, with an estimated $8 million price tag. In April 2016, British Columbia’s Ministry of Transportation and Infrastructure announced $4 million will be provided for the project from the 2016 budget. While the Fraser Valley continues to fight to protect its land and livelihood from the power of the Fraser River, the Ministry has further committed to collaborating efforts to ensure the communities with potential impact are kept safe; work on upgrading the dykes themselves will also be prioritized.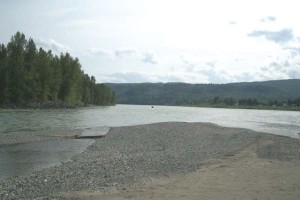
Protecting Fraser Valley dykes from erosion of the Fraser River banks, proactive measures need to be taken. Erosion control will ensure infrastructure remains sound, homes are protected, farms flourish, and our historical sites live on.